4.10.2012

New Blog!

Hello my lovely followers! I've clearly been behind on this blog, but I'm starting to get back to the grind!

I've relocated, however, and now you can find me at my new blog: Saltwater Tears.

This blog will encompass everything that has been mentioned in my previous blogs: Faith, Food, and Farming. I've moved all of the posts from this site to my new blog, so don't worry, you won't be missing anything!

I'd love for you to check out my new page and keep in touch with me! Thank you for all of your support!  

7.31.2011

Recipe 15: Bruschetta.

Mmmmhmmmm. I love summer. I don't love heat or humidity, sweat or sweltering days. But I do love summer. Freedom (kind of...I mean, there is work), cutoff shorts, starry nights, and bonfires. Then there's summer food. Watermelon, sweet corn, fresh fruit, and all things tomato and basil.

Yes.

For me, tomato and basil (and maybe the occasional burst of garlic) are the Christmas of summer. The colors make it pretty obvious, but the taste is so gosh darn merry as well.

Bruschetta. 


-Italian bread
-5-6 Roma tomatoes
-Fresh basil (10-12 leaves)
-2 cloves garlic
-1/4 cup olive oil
-Fresh parmesan and mozzarella cheese
-Salt and pepper to taste

I'm salivating just typing this. So you know.


Step 1: Make some bruschetta.
Start with the tomatoes. Wash and dice and toss into a bowl. Next comes the basil. Do that chiffonade thing I showed you before. If you didn't see that post or forget, it's in this post right here. Throw the fresh basil into the bowl and take in the wonderful-ness of the pretty red and green. Next, mince the garlic cloves. And if you don't remember how to break into the clove, look at this post here. Good thing I did tutorials, huh? Annyyywayyy. Mince the garlic and toss it in the bowl. The smaller the pieces, the better. Unless you like mega-potent bites, I'd go as fine as possible.  Add a little bit of salt and pepper and the olive oil and your done. Not too difficult. Now for pictures.


Step 2: Finish it up.
Okay, I'm not real sure why I keep doing steps for this stuff. I think I'm going to take them out next post. Just so you know. Anyway, slice the bread at a diagonal with about half inch thickness. Then spoon on the bruschetta and sprinkle with some fresh parmesan and mozzarella cheese. Bake at 400 degrees for about 10 minutes or until cheese is golden brown. You may want to broil for a few minutes as well to finish it all up and melt the cheese completely. 


Bada bing, bada boom. All done and delicioso!!! 


Happy eating!! Share the love!!

-Olivia.


7.16.2011

Recipe #14: Chocolate Brownies With Chocolate Chunks Dipped & Drizzled In Mint Chocolate.

I mean, soak that title in. Really, soak it in.

My friend Julie gave me the original recipe last year and I tweaked it with the mint twist. I can't say it's a Christmas tradition since last year was the first time I made them, but I decided the mint chocolate thing would stay strictly holiday. Until I got a little craving for some Christmas in July.

Chocolate Brownies With Chocolate Chunks Dipped & Drizzled In Mint Chocolate.


-1/3 cup butter
-3/4 cup sugar
-2 Tablespoons water
-1 teaspoon vanilla
-2 eggs
-3 cups semi-sweet chocolate chips
-1 cup Andes baking mints
-2 eggs
-3/4 cup flour
-1/4 teaspoon baking soda
-1/2 teaspoon salt
-2 Tablespoons shortening

It's the most wonderful time of the year. :)


Step 1: Homemade brownies!
Start by melting and boiling the butter, water, and sugar together in a saucepan. Make sure to only boil for 30-45 seconds so you don't over-boil. 


Mix in vanilla and 1 cup of chocolate chips until smooth. Remove from heat after this step for 5 minutes.


The reason you let it cool- the eggs. I forgot to take a picture of this step, but regardless, make sure to let the mixture cool for a few minutes. If not, the eggs will cook when you mix them in. No one wants set up egg whites in their brownies. Add them one at a time until mixed well. 

Mix the flour, salt, and baking soda in a separate bowl. Combine this mixture with the chocolate mixture. Then stir in 1 cup of chocolate chips in. 


Pour into a 9"x9" or 8"x9" (that's what I used) pan lined with nonstick foil. If you don't have nonstick, just regular, put the non-shiny side up. 


Bake at 325 degrees for 35 minutes. Let cool completely. I remove the foil lined brownies from the pan so they cool quicker. 


Step 2: Get them dip ready!
Wrap foil around the brownies and put in the freezer for awhile. Don't let them freeze completely, because you'll need to cut them. Once they're cut, wrap them up and freeze them completely this time. 


Does it get any better than this? Yes. Just wait. 

Step 3: Dip and Drizzle!
Melt the remaining cup of chocolate chips and the cup of mint chips together with the shortening in a double boiler. Take the frozen brownie bars out of the freezer a few at a time and dip them. Place on wax paper, drizzle with more mint chocolate and refrigerate to harden the chocolate. 


\


Amazing-ness.


Happy eating!! Share the love!!! 


7.06.2011

Recipe #13: Fruit Salsa.

My most sincere apologies for letting you all down over the past month! I started my job the day after my last post and have completely neglected the kitchen and camera combo. But I'm back, and better than ever. Or at least making an attempt at that. So now for a summer classic-

Fruit Salsa.


-2 Small Granny Apples
-1 cup Strawberries
-1 cup Blueberries
-1 Small Orange
-1 Kiwi
-2 Tbsp. Brown Sugar
-2 Tbsp. Apple Jelly


I obtained this recipe a few summers ago from my mom's (and I count her as my own as well) friend Michelle. Side note; Michelle started an AWESOME Non-Profit called Hope For His Children, Inc. you should ABSOLUTELY go and check it out. And maybe, just maybe, "like" the Facebook page. It's a total summer dish. I mean, you could make it in the middle of December, but what fun would that be? It would be like making peppermint bark for the Fourth of July.


Step 1: Get that fruit prepped and ready!
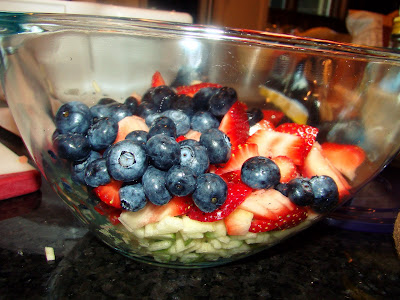
This is really the only step. I mean, the only step that requires any real work. Wash the fruit, and slice it all up! Place all of the fruit in one bowl and mix it up. In case you aren't following, here are the pictures.

Does it get any more summer than this?

Cut the apples pretty small. The food processor won't cut the apples near as much as the other fruit later on, so work ahead on this! 


The strawberries can remain a little bit larger because they're a softer fruit. This will also go for the rest of the fruit as well.


I just toss in about two handfuls of blueberries, don't really worry about measuring.

In my opinion, most successful way to get to a kiwi is the "spoon method".


I'm horrible at peeling oranges. And I hate that white stuff. So since it's all being chopped up anyway, cutting away the peel works for me. 

My grater was in the dishwasher, but I sliced off a little bit of orange zest as well. It's okay if it's not grated; it will be chopped in the food processor.

Throw it all in the bowl and mix it up! 


Step 2: Let's make some salsa!
My processor isn't industrial by any means, so I had to do this a little at a time. Gradually, food process the fruit mixture. I suggest doing 5-6 pulses. 


It should end up looking something like this. 


Step 3: Final touches!
Stir in 2 Tablespoons of brown sugar and 2 Tablespoons of apple jelly and you're good to go! 


The key is to eat the salsa with cinnamon sugar chips. Target used to sell them under the Archer Farms label, but sadly discontinued them. Luckily, Michelle pointed me in the way of Stacy's Pita Chips in cinnamon sugar. De-lish! You can also make your own chips by brushing butter on flour tortillas, sprinkling with cinnamon sugar, and baking at 450 degrees until crisp.


Summer Lovin'. :)


Happy eating! Share the love!!

-Olivia.


6.05.2011

Recipe #12: Beer Battered French Fries.

Another recipe that I originally obtained from the lovely Julie Taylor.  I originally tried this recipe my senior year of high school. Except, then, we of course didn't use beer, we could only use water. And in fact, water is in the original recipe. Julie was the one who thought of using beer last summer. The beer doesn't add amazing taste. I'll be honest. But it's kind of fun to say that you're going to make beer battered french fries. So I did.

Beer Battered French Fries. 


-2 1/2 lb. russet potatoes (I just made one for each person I served plus one or two. Then again, I had extra.)
-1 cup flour
-1 teaspoon onion salt
-1 teaspoon garlic salt
-1 teaspoon salt
-1 teaspoon paprika
-1/2 cup beer

As for the beer....I'm underage. I'm not a beer connoisseur. I don't know what is best or what is worst. I used Budweiser in my fries because, frankly, that's what my mom bought me when I asked her to get me beer. I'm assuming that you could use your favorite beer, should you have one, or water if you can't get your hands on the alcohol. Also, the 1/2 cup can be varied. Just add whichever liquid you choose until you think the batter is the right consistency.


Step 1: Get the potatoes ready.
Wash, peel, and slice potatoes into french fry size. Then place the new fries into a bowl of water to keep them from drying out. 


Step 2: Make the batter!
Pretty simple, really. Just combine the dry ingredients and then stir in the beer/water until it reaches the right consistency. 


Step 3: Batter them fries!
Immerse the potato slices in the batter and coat thoroughly. 


Step 4: Fry 'em and eat! 
When frying, be sure not to just dump all of the fries into the deep fryer.  The batter will stick together and not cook all the way. This is the worst part of the whole process. The frying can be time consuming, but I do think it's worth it. 


Step 4: Eat and eat and eat!
Epic french fries. Epic. 


Happy eating!!! Share the love!

-Olivia.